To access the Visual IVR Editor, you need to log in as an Administrator.
1.
Log in to your BT Cloud Phone Portal.
2. Under the
Admin Portal page, click
Phone System.
3. Click on
Auto-Receptionist.
4. Click on the
IVR Editor tab.
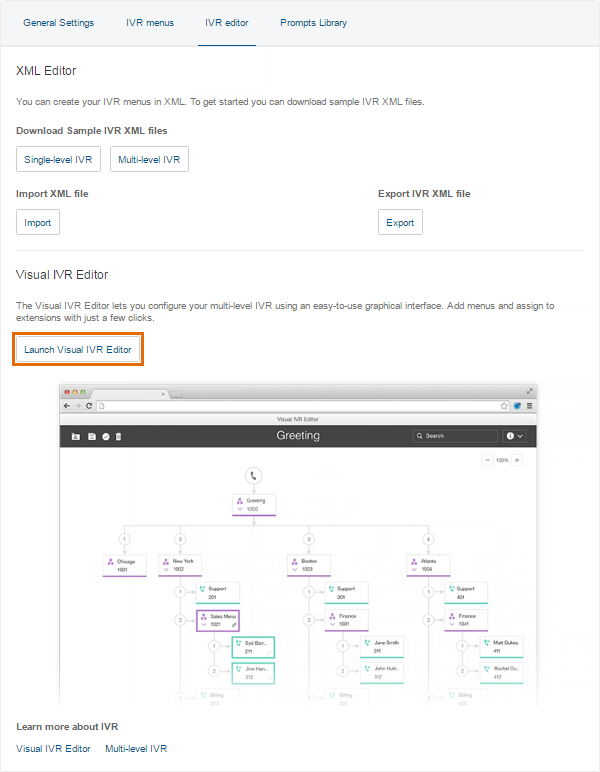
5. Under the
IVR Editor tab, look for
Visual IVR Editor, and then click
Launch Visual IVR Editor.
 NOTE:
NOTE: If this is your first time accessing the feature, you may see a short interactive demo when you click on
Launch Visual IVR Editor. The interactive demo will guide you in navigating the Visual IVR Editor.
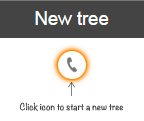
6. To create a new menu, simply click the

phone icon. This will automatically generate a menu with a preset extension which can be customized later.
To open and edit an existing IVR menu, follow the steps below:
1.
Log in to your BT Cloud Phone Portal.
2. Under the
Admin Portal page, click
Phone System.
3. Click on
Auto-Receptionist.
4. Click on the
IVR Editor tab.
5. Under the
IVR Editor tab, look for
Visual IVR Editor, and then click
Launch Visual IVR Editor.
6. Click the
Folder icon on the top left corner of the Visual IVR Editor interface. This will bring up your list of existing menus.
7. Select the IVR menu that you want to edit from the list. Clicking on an IVR menu will show you its preview on the right pane. To edit your selected IVR menu, click on
Open.
To add sub-items to your IVR tree, follow the steps below:
1. Hover your mouse over the Menu and click on the Plus icon.
2. This will expand to show a list of sub-items that you can add. The following sub-items can be added to an IVR Menu:
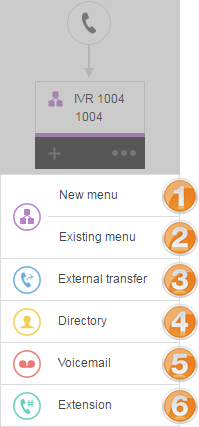 | 1. New menu - Lets you create a new menu as an option to your IVR tree. The extension and name is auto-generated and can be edited later. |
| 2. Existing menu - Lets you use and add an existing menu to your IVR tree. When you select this option, the list of menus will open on the left-hand part of the page. Click on the desired menu to preview it, and then click the Use button to add it to your IVR tree. |
| 3. External transfer - Lets you include an external number in your tree. When you select this option, your callers will be transferred to the number that you have specified. |
| 4. Directory - Lets you attach your BT Cloud Phone dial-by-name directory to your IVR tree. |
| 5. Voicemail - Gives an option to your callers to leave a voicemail. |
| 6. Extension - Lets you add a specific extension to your IVR tree. This can be a group or a User. |
NOTE: After adding sub-items to your IVR menu, the editor will automatically assign the key presses. These can be changed by directly clicking on the number.
3. To save the configuration, click the Save button located at the top left corner of the Visual IVR Editor.
NOTE: When you click
Save, BT Cloud Phone will automatically validate the configuration of your IVR Menu and advise you of any invalid configuration. For more information, go to
Validating your IVR Menu's Configuration.
Menus can be customised for better organisation and functionality.
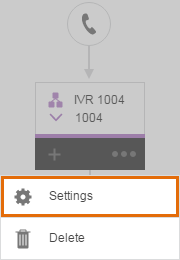
1. Hover your mouse over an existing Menu in the Visual IVR Editor, and then click on the

button.
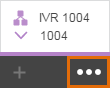
2. On the drop down, click
Settings.
3. The
Menu settings window for your selected IVR menu will open and allow you to configure the following:
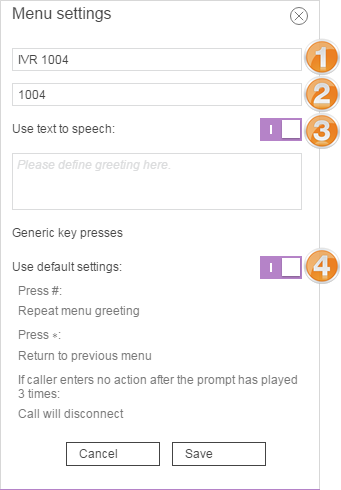 |
1. Name - Lets you identify an IVR Menu. It is recommended to change it to indicate how the menu is used (e.g. Support Menu).
|
|
2. Extension number - Lets you route calls to this IVR menu.
|
3. Prompt / Greeting - When the toggle is ON  , you can use the Text to speech feature where you can define your greeting by typing it in the box provided. , you can use the Text to speech feature where you can define your greeting by typing it in the box provided.
When the toggle is OFF  , you can select from your list of pre-recorded prompts that you have imported from your computer to your BT Cloud Phone account. , you can select from your list of pre-recorded prompts that you have imported from your computer to your BT Cloud Phone account. |
4. Key Presses - Lets you change how the # and * keys function for the menu. You can also change what happens when the caller does no action after the audio prompt has been played 3 times.
For more information, go to Generic Key Presses. |
4. Click Save.
5. To save the configuration, click the Save button located at the top left corner of the Visual IVR Editor.

NOTE: When you click Save, BT Cloud Phone will automatically validate the configuration of your IVR Menu and advise you of any invalid configuration. For more information, go to Validating your IVR Menu's Configuration.
When the
Use default settings toggle is
ON 
, your IVR menu will follow the actions below:
Press #: Repeat menu greeting
Press *: Return to previous menu
If the caller enters no action after the prompt has played 3 times: Call will disconnect
When the
Use default settings toggle is
OFF 
, you can choose how the
# and
* keys function for your IVR menu and where the call is routed if the caller enters no action after the prompt has played 3 times.
To save the configuration, click the Save button located at the top left corner of the Visual IVR Editor.
NOTE: When you click
Save, BT Cloud Phone will automatically validate the configuration of your IVR Menu and advise you of any invalid configuration. For more information, go to
Validating your IVR Menu's Configuration.
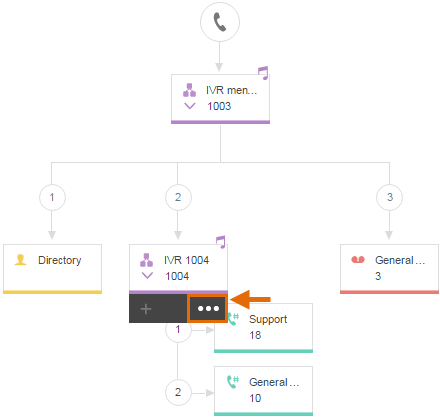
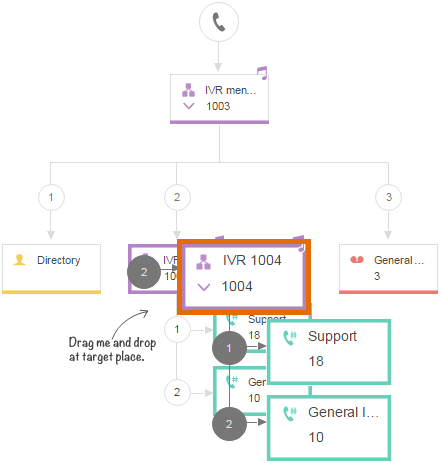
IVR menus can be easily duplicated and placed under other menus. This is especially useful if you're managing bigger IVR menu trees across several departments that require similar menu options. To illustrate this, see the example below.
For step by step instructions, see below:
1. Hover your mouse over a sub-menu in the Visual IVR Editor, and then click on the button.
2. Click
Duplicate.
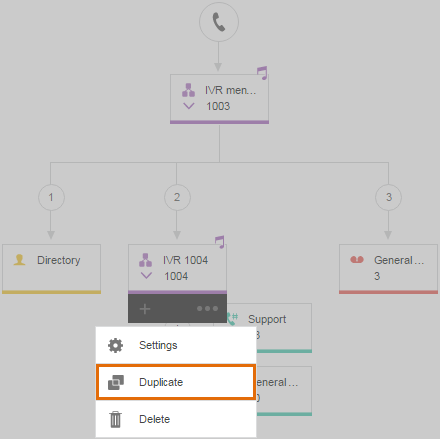
3. A duplicate copy of the the sub-menu will appear in the foreground which you can drag and drop to your IVR Menu.
4. When you drop the duplicate sub-menu to your IVR Menu, a confirmation box will appear giving you an option to create a linked or unlinked copy of the sub-menu. When you create a linked copy, future changes made to this instance will apply to all other linked instances in your account. You can create a linked copy then unlink it later if needed.
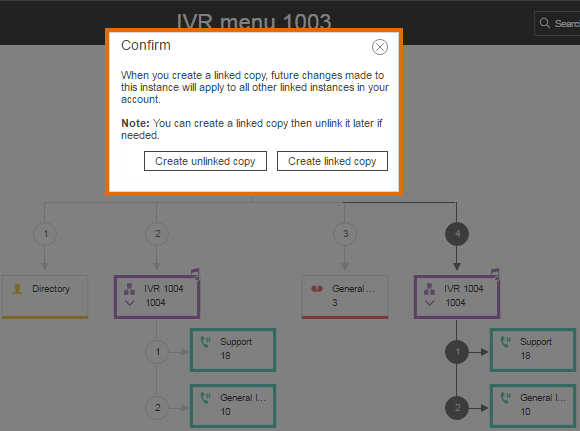 NOTE:
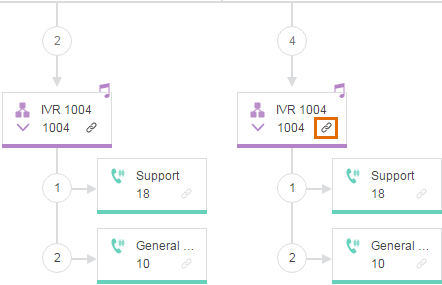
NOTE: To unlink a copy of a sub-menu, click the chain-link

on the sub-menu.
5. To save the configuration, click the Save button located at the top left corner of the Visual IVR Editor.
NOTE: When you click
Save, BT Cloud Phone will automatically validate the configuration of your IVR Menu and advise you of any invalid configuration. For more information, go to
Validating your IVR Menu's Configuration.
To ensure your Multi-Level IVR tree is working properly, you can use the
Validate option. This runs a full scan on your IVR menu and attempts to locate any error that may cause malfunction. After validation, you may get errors or warnings and if not corrected, callers may hear error messages when interacting with the menus or your call routing may not behave as expected.
Click the links below to learn more:
•
Errors•
Warnings
When you get IVR Menu errors, you will be required to fix the errors before you can save your work. The example below shows configuration errors on sub-menu 1005 and key press 1.
To fix the error on sub-menu 1005, you must go to its settings, and specify a greeting or prompt. For more information about Menu settings, go to
Editing the Settings of an IVR Menu.
To fix the error on key press 1, click on
Extension to select the extension where you want to route the caller when they press 1 on your sub-menu.
If the validation tool is unable to find errors, it gives a message that all of your IVR settings are valid.
The example below shows a warning after
editing an existing IVR Menu. The warning shows that the IVR Menu 1003 already exists. You have 2 options to address this warning:
If you want to save the existing and current configuration, you can change the extension number assigned to the IVR Menu, and then click the Save button.
In the example below, we changed the extension number from 1003 to 1008. This way we get to keep the existing configuration on IVR Menu 1003, and the new one on IVR Menu 1008.
If you intend to replace the existing configuration with the new one, you can click on
Continue without changing the IVR Menu's Extension number.
IMPORTANT: Changes made to an IVR configuration are permanent and irreversible.
When you click
Continue, the previous IVR configuration will be replaced by the most recent changes made and an alert will advise that your IVR settings have been updated successfully.
The Litter bin icon on the top left menu clears your IVR workspace and does not delete an IVR Menu. To delete an IVR Menu, follow the steps below:
1.
Log in to your BT Cloud Phone Portal2. Under the Admin Portal page, click Phone System.
3. Click on Auto-Receptionist.
4. Click on the IVR menus tab, hover your mouse over the IVR Menu that you want to delete, and then click on Delete.
5. A pop-up window will confirm your request to delete the IVR Menu. Click on the
Delete button to confirm.
NOTE: Linked items and sub-menus can be removed directly from the Visual IVR Editor. This can be done by clicking the item's Delete icon.